Mod 0 - Computer Setup
Complete the following steps before your first Mod 0 session in order to get the tools you’ll need on your machine. Plan to spend 60-120 minutes on this.
Here’s what we’ll cover in this guide. Click a link to jump to that portion of the guide:
- Install Rectangle
- Install Chrome
- Install Slack
- Create a Replit Account
- Create a Loom Account
- Install Zoom
- Enable Screen Sharing
- Install Xcode-select
- Install and Configure VS Code
- Install Homebrew
- Install Git
- Configure GitHub
- Install rbenv
- Install Node
Install Rectangle
Rectangle is a screen management application that allows you to move and resize windows to maximize your screen space as well as your time.
Once you’ve installed Rectangle, open the application and it will run in the background. You should see a smaller version of the Rectangle icon in the top right corner of your screen.
Action Steps:
- Download and install Rectangle.
- Take some time to play around with the commands to adjust the position and size of different windows on your screen using the Rectangle keyboard shortcuts.
Install Chrome
Chrome includes a set of Developer Tools that will come in handy down the road. Additionally, it is always on the cutting edge of supporting new web technologies.
Action Steps:
- If you haven’t already, download and install Chrome.
- Set Chrome as your default browser:
- In your Chrome window, select the More menu by clicking on the three dots.
- Select
Settingsfrom the list. - In the Default browser section on the left, click
Make default.
Install Slack
Slack is our main communication tool at Turing. You will receive an invitation to join the Turing Workspace 2 weeks before your Mod 0 start date. If you are not familiar with it, it may seem overwhelming at first. There are a lot of tips and tricks you’ll pick up along the way.
Action Steps:
To ensure that you are prepared for your first session:
- Watch the Slack Tutorial Video.
- Read Slack 101 to understand how to take advantage of the most useful features in Slack.
- Upload a clear and appropriate headshot for your profile image.
- Set up your Slack profile to include your cohort and program (ex: 2407SE), pronouns, and time zone.
- It’s a good idea to get in the habit of checking Slack daily starting now.
Create a Replit Account
Replit provides an online platform that allows us to write code and see the results almost immediately - all inside of one browser tab! There are many other similar (and awesome) tools available but replit is used regularly in Mods 1 and 2, so Mod 0 provides an introduction and some exposure.
Follow the steps below (if they are not necessary because you have already done them or have experience with replit, you can skip this):
- Create a free account.
- Bookmark this webpage on Chrome, so that you can easily find it again later.
- Watch this video to learn how to navigate the interface and create new projects.
Create a Loom Account
Loom is a free online video tool that allows you to create instantly shareable videos. With Loom, you can record your camera, microphone, and desktop simultaneously. You will be required to submit videos throughout Mod 0 as part of the coursework. Although you can use other tools to accomplish the same goal, we strongly recommend using Loom as it is extremely user-friendly.
- Please create a free account with Loom.
- Bookmark this webpage on Chrome, so that you can easily find it again later.
- If you’ve never used Loom before, watch this video to familiarize yourself with this tool.
Install Zoom
Zoom is the primary tool for classroom time, study halls, and community building at Turing.
Action Steps:
- Download and install Zoom for Macs with Apple Silicon chips
- If you haven’t already, create an account with Zoom.
- Update your name in your profile following this pattern: First Name, Last Initial, pronouns, Program -
Kaitlyn V (she/her), SE. - Learn how to raise your hand.
- Give your Zoom account screen sharing permission and microphone permission.
Enable Screen Sharing
Turing is a fully remote and highly collaborative program, which means you will be sharing your screen a lot.
Action Steps:
- Enable screen sharing permissions by taking the following steps:
- Open the System Preferences app by pressing the
command + spacekeys at the same time, which opens Spotlight. Then, start typing “System Preferences”; it will auto-fill. Pressreturnand the System Preferences application will open. - Click
Security and Privacy. - Click the
Privacytab. - Scroll down to Screen Recording and click the small “plus sign” button. In the window that opens, navigate to the Applications, then click on “Zoom”.
- Open the System Preferences app by pressing the
Running Commands in the Terminal
The remainder of the Computer Setup steps will be completed via the Terminal application. This may be very new and potentially overwhelming to you! Follow the directions closely to work through each section.
The directions will use a phrase that may be new to you: "Run ____". When you are instructed to "run something", it means that you need to type those characters into the Terminal where you see the command prompt, then press return.
Command Prompt Notation
A common convention in documentation that outlines anything regarding the Terminal is to notate a command one should run by starting the line with a $ or %. As the developer, you should not type the $ or %; you should only type the command that follows it. It is meant to represent your command prompt (which is usually the path to your working directory).
Install Xcode-select
Xcode is a suite of development tools published by Apple. If we wanted to develop software for the Apple Ecosystem (iPhone apps, macOS apps, etc), we would use Xcode as our editor. Even though we’re not building iPhone apps, Xcode provides some system dependencies that we need.
Rather than download Xcode via the Apple Store, we can get a much smaller selection of necessary tools, called xcode-select, via our Terminal.
Action Steps:
- Install
xcode-selectto your machine by taking the following steps:- Open the Terminal by pressing the
command + spacekeys at the same time, which opens Spotlight. Then start typing “Terminal”; it will auto-fill. Pressreturnand the Terminal application will open. - Once the Terminal is open, run
xcode-select --install. This download may take up to several hours. - When prompted, enter the password you use to login to your computer.
- Run
xcode-select. Ifxcode-selectwas installed properly, you should see something like this:$ xcode-select xcode-select: error: no command option given . Usage: xcode-select [options] . Print or change the path to the active developer directory. This directory controls which tools are used for the Xcode command line tools (for example, xcodebuild) as well as the BSD development commands (such as cc and make). . Options: -h, --help print this help message and exit (... and many more lines similar to the one above)
- Open the Terminal by pressing the
Install and Configure VS Code
Visual Studio Code (VS Code) is a code editor, which is a program where we write and edit code. You’ve probably used Word or Google Documents in the past; this is similar, but a program specifically designed for writing code. There are many code editors available, and once you get a foundation you may choose to use others. We ask all students in Mod 0 and Mod 1 to use VS Code, so that staff can best support students and students can easily collaborate with one another.
Action Steps:
- Download and install Visual Studio Code.
- After downloading VS Code, ensure that VS Code appears in your Applications folder and is no longer in your Downloads folder!
VS Code is where we write the code that powers our applications, but we’ll also do important work in the Terminal. We need our Terminal to be able to “talk to” VS Code.
Action Steps:
- Open VS Code (from your Applications folder).
- Add VS Code to your Dock permanently by right-clicking on the icon (located in the Dock) and then select Options, followed by Keep in Dock.
- Open the Command Palette (
command + shift + p) and type ‘shell command’ to find the Shell Command: Install ‘code’ command in PATH command. - Confirm the Shell Command is installed properly by taking the following steps:
- Quit VS Code (
command + q). - Open a new window in Terminal with the Spotlight search (
command + space, start typingTerminaland pressreturn). - Run
code .in the Terminal. Be sure to include a space betweencodeand the.If the Shell Command is installed correctly, VS Code will automatically open. - Once you have confirmed this is working, quit VS Code (
command + q) and continue with the computer setup!
- Quit VS Code (
Install Homebrew
Homebrew is a package management system that allows us to install and run various programs on our machines—programming specific programs that we can only install via the Terminal.
Action Steps:
- Install Homebrew by taking the following steps (some steps may take several minutes or more to finish):
- Go back to your
Terminalwindow and run the following command (not including the$):$ /bin/bash -c "$(curl -fsSL https://raw.githubusercontent.com/Homebrew/install/HEAD/install.sh)" - When prompted, enter the password you use to log in to your computer. It needs this because it installs its packages in a place that all users of this computer can access. You will get a message that says, “Press RETURN to continue or any other key to abort.” Press
return. - When it has completed the installation, which may take some time, carefully read the output. Under the “Next steps” section, copy the two recommended commands, paste them after your Terminal prompt, and hit
returnto add Homebrew to your PATH.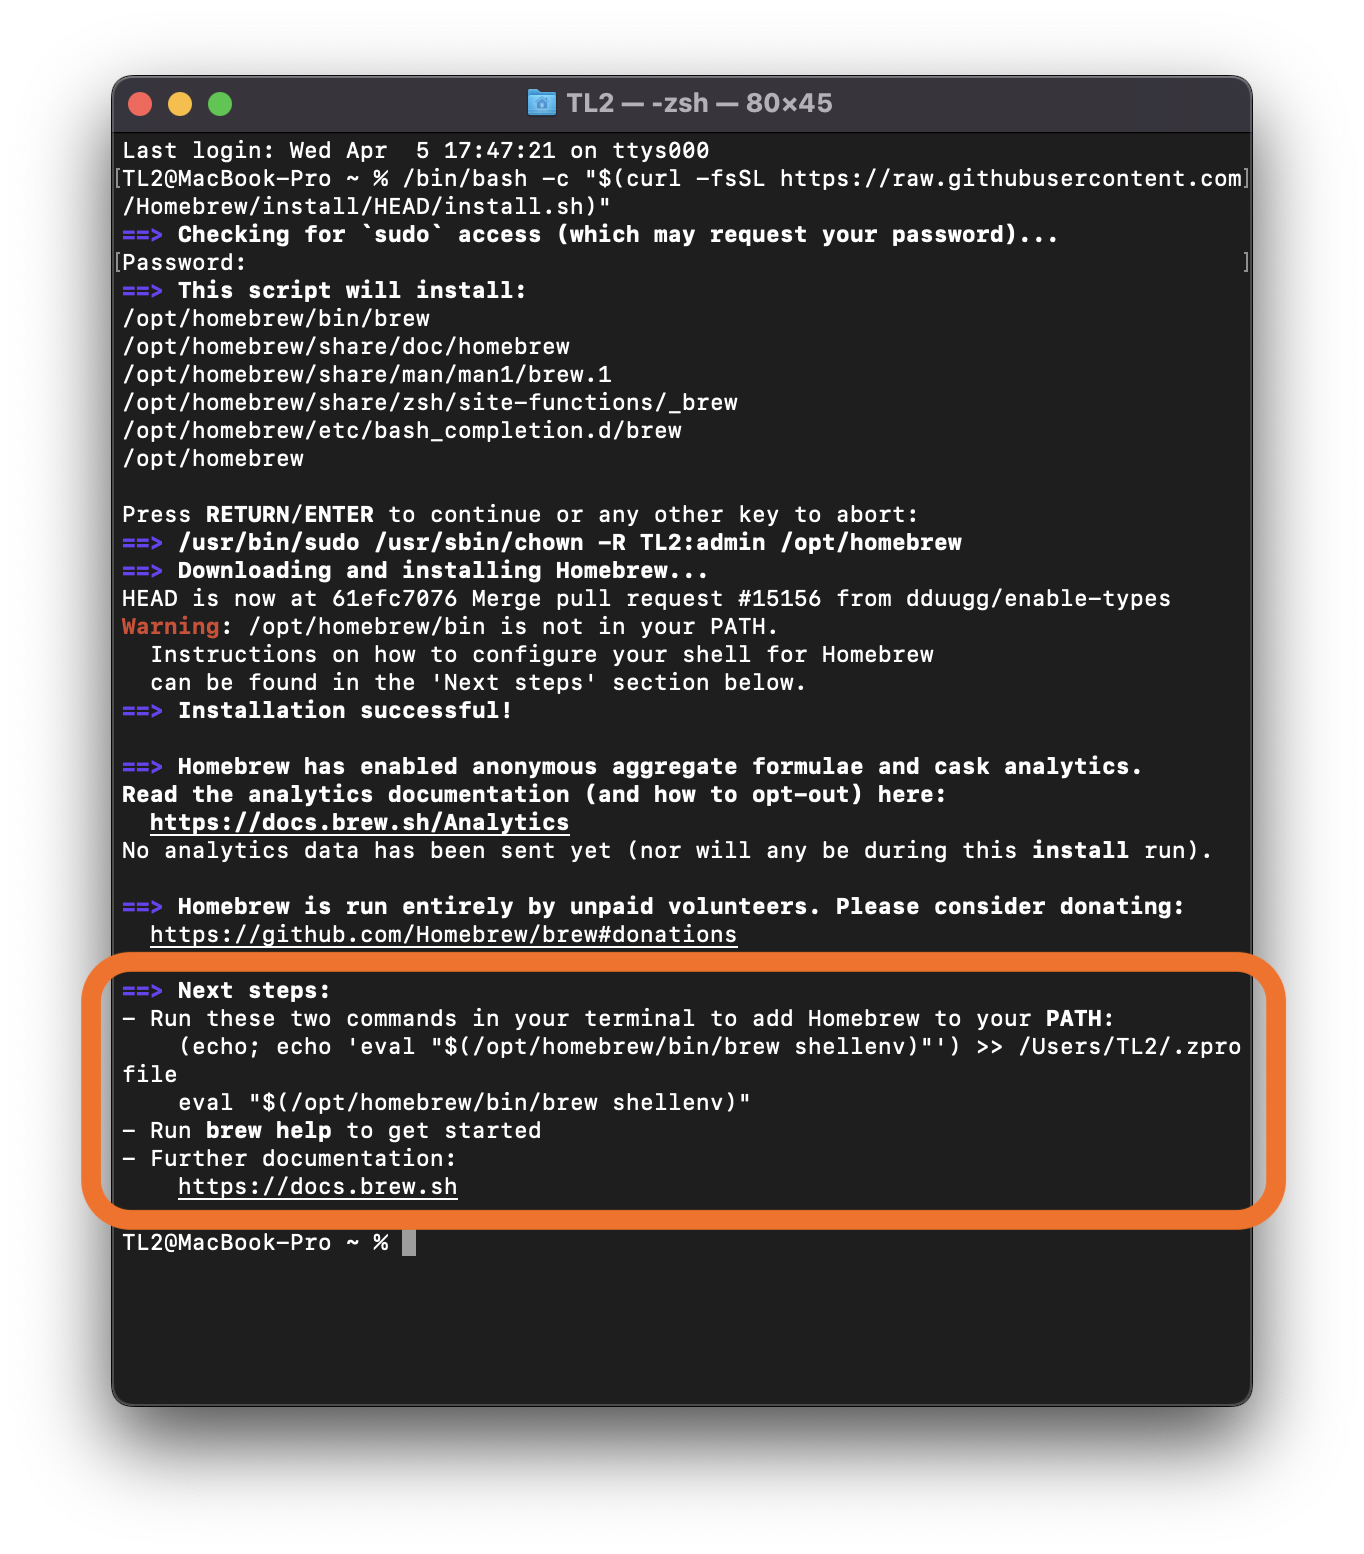
- To confirm these commands worked, open your
zprofilefile by runningcode ~/.zprofilein your Terminal. If the previous step was done correctly, you should see the following line in that file.eval "$(/opt/homebrew/bin/brew shellenv)" - Quit VS Code and the Terminal using
command + qthen start a new Terminal session. Runbrew doctor. The output should tell you that everything is fine:$ brew doctor Your system is ready to brew.
- Go back to your
Install Git
Git is a Version Control System. It allows you to save work on your project and reference previous states of a project, if needed. Normally when we save something on our computer, the newer version overwrites the older version. This is problematic if we need to look back at an earlier version. Git solves this problem by providing you multiple save points. You can get the current version, and any previous version. Git’s philosophy: never lose anything.
Note: Git is not the same thing as GitHub. You’ll learn more about how they interact as you work through Mod 0.
Action Steps:
- Install Git on your machine by taking the following steps:
- Open the Terminal, and run
brew install git. - Check that it was successful by running
gitin the Terminal. It should output something like what follows:$ git usage: git [--version] [--help] [-C <path>] [-c <name>=<value>] [--exec-path[=<path>]] [--html-path] [--man-path] [--info-path] [-p | --paginate | -P | --no-pager] [--no-replace-objects] [--bare] [--git-dir=<path>] [--work-tree=<path>] [--namespace=<name>] <command> [<args>] . These are common Git commands used in various situations: start a working area (see also: git help tutorial) clone Clone a repository into a new directory init Create an empty Git repository or reinitialize an existing one . . .
- Open the Terminal, and run
- Configure Git by carefully taking the following steps:
- Open the Terminal with Spotlight search (
command + space) - Run the following commands, one at a time, substituting your own info for the first two commands:
$ git config --global user.name "Eric Weissman"
$ git config --global user.email eric@example.com
$ git config --global init.defaultBranch main
$ git config --global core.editor "code --wait"
$ git config --global pull.rebase false
- Open the Terminal with Spotlight search (
Configure GitHub
GitHub is a widely used platform that hosts code projects and allows for collaborative workflows. You will spend a lot of time on this site and become fluent in using it as a tool.
Action Steps:
- Create an account on GitHub.
- Update your GitHub Profile and be sure that you choose a username, status, profile info, and picture that are appropriate for a professional setting. GitHub is a platform where future/potential employers will be reviewing your work.
SSH keys are a secure and convenient way to authenticate. We won’t get into more detail right now, but setting this key up lets you skip typing in a password every time you want to interact with GitHub from the Terminal (which is going to be often!).
Action Steps:
- Set up your SSH key by taking the following steps:
- Open the Terminal and run the following command - Use the email associated with your GitHub account.
$ ssh-keygen -t rsa -C "johndoe@example.com" - When you’re prompted to “Enter a file in which to save the key,” press
return. This accepts the default file location, which is~/ssh/id_rsa. - When asked to enter a password, press
enter, which means “no password”. You’ll see a confirmation message that looks like what follows:Your identification has been saved in id_rsa. Your public key has been saved in id_rsa.pub. The key fingerprint is: SHA256:C3AB8FF13720E8AD9047DD39466B3C8974E592C your@email_address.com The key's randomart image is: +---[RSA 2048]----+ | . = .. | |o . . o + = .. | | =.o o o o o . | |+ +o. . .. . . | |.+E . S o o..| |.. . .o . .+| | o oo .o+| | . o ==o.=| | . .+=B=o | +----[SHA256]-----+ - In the Terminal, run
ssh-add ~/.ssh/id_rsa. - In the Terminal, run
pbcopy < ~/.ssh/id_rsa.pub. This will add the SSH key to your clipboard. - Go to https://github.com/settings/keys. (You must be logged into your account!)
- Click the green “New SSH key” button.
- Leave the “title” section empty.
- Paste the key into the “key” section with
command + v. - Click the green “Add SSH key” button.
- To test that our key is configured, run
ssh -T git@github.comin the Terminal. You should see something similar to the following.The authenticity of host 'github.com (192.30.252.153)'... can't be established. RSA key fingerprint is 00:11:22:33:44:55:66:77:88:99:aa:bb:cc:dd:ee:ff. Are you sure you want to continue connecting (yes/no)? - When you see the above prompt, type
yesand hitreturn. At this point, if everything is set up correctly, you should see the the following:Hi <your_username>! You've successfully authenticated, but GitHub does not provide shell access.
- Open the Terminal and run the following command - Use the email associated with your GitHub account.
Install rbenv
Action Items:
- Install
rbenvand verify it was installed correctly by taking the following steps:- In the Terminal, run
brew update. This may take several minutes. - Run
brew install rbenv. This may also take several minutes. - Run
rbenv init. The output should be something like:# Load rbenv automatically by appending # the following to ~/.zshrc . eval "$(rbenv init -)" - Run
touch ~/.zshrcto create thezshrcfile that was referenced in the previous line. - Run
code ~/.zshrc. VS Code should open to a blank file, thezshrcfile. Inside this file, type or copy-and-paste in:eval "$(rbenv init -)". Save the file withcommand + s. - Close the Terminal using
command + q- this is absolutely necessary! Clicking the red dot in the corner is not a substitute. - Re-open the Terminal, and run
rbenv versions. As long as you don’t get an error message,rbenvhas been installed correctly.
- In the Terminal, run
- Use
rbenvto change Ruby versions by taking the following steps:- In the Terminal, run
rbenv install 3.2.2. This may take several minutes, and will likely print a lot of output. Wait patiently until it finishes and the command prompt returns. You may also get a message that this version of ruby is nearing the end of its life. While this sounds scary, it’s actually ok! You will still be able to use this version of ruby. It only means that this version will no longer receive further critical security updates. - Run
rbenv versions. You should now see3.2.2listed. - Run
rbenv local 3.2.2. - Run
ruby -v. If the output does not includeruby 3.2.2,command + qout of the Terminal and start this step over. If you still aren’t seeingruby 3.2.2, check that you correctly followed the step above to edit your.zshrcfile. - Run
rbenv global 3.2.2thenrbenv rehash. You should not expect any output from those commands.
- In the Terminal, run
- If you’ve followed these steps and are having issues, please DM the Mod 0 Lead on Slack ASAP. It is essential
rbenvis installed on your machine correctly.
Install Node
To write JavaScript in the command line and use essential “packages” while building apps, node and npm must be on the machine. nvm allows us to easily change the version of node our machine is using.
Action Items:
- Install
nvmand verify it was installed correctly by taking the following steps:- Run the following command in your Terminal:
$ curl -o- https://raw.githubusercontent.com/nvm-sh/nvm/v0.39.1/install.sh | bash - Use
cmd + qto close the Terminal. Then, re-open it. - Run
command -v nvm. You should see the outputnvm, which confirmsnvmhas been properly installed.
- Run the following command in your Terminal:
- Install and change to the latest stable version.
- In the Terminal, run
nvm install --lts. - Run
nvm use --lts. The output should say something likeNow using node v18.18.2 (npm v9.8.1). It’s okay if those numbers differ - It’ll show whatever the latest version is.
- In the Terminal, run
That’s all folks!
To verify that all steps are completed and installations are working as expected, complete the steps below. If you do not get the expected output for any of the following steps, go back to that step in the computer setup and carefully follow all of the steps a second time.
- Quit out of all applications and close any extra windows. You can verify that only Terminal and Chrome are running by looking at your dock at the bottom of your screen. Applications that are currently running will have a little black dot under them. Then, open only this webpage and a new Terminal window.
- Rectangle: Use
control + option + left arrowto move this webpage to the left side of your screen andcontrol + option + Ito move your terminal to the upper right corner. Note: Your window cannot be in full-screen mode for rectangle to work. - Chrome: In your Chrome window, open a new tab. At the very top under the address bar, you should at least one bookmarked page – the Mod 0 Site.
- Slack: Ensure that Slack is downloaded by opening up the Slack application using Spotlight. Hold down
command + spaceto open up Spotlight and start typingSlack. Hitreturnand your Slack application should open in a new window. Quit Slack by holding downcommand + q. - Zoom: Ensure that Zoom is downloaded by holding down
command + spaceto open up Spotlight and start typingZoom. Hitreturnand your Zoom application should open in a new window. Quit Zoom by holding downcommand + q. - XCode-select: In your terminal, run
xcode-select -v. If installed, your terminal will output the current version of xcode-select found in your system. For example, something like:xcode-select version 2384.. - VS Code: In your terminal, run
code .. If installed correctly, your VS Code will open in a new window. Quit VS Code by holding downcommand + q. - Homebrew: In your terminal, run
brew doctor. If installed correctly, your terminal will outputYour system is ready to brew.. - Git: In your terminal, run
git config --list. If set up correctly, you will see your current git configurations:credential.helper=osxkeychain user.name "Eric Weissman" user.email eric@example.com init.defaultBranch main core.editor "code --wait" pull.rebase false - GitHub: To test that you configured your SSH key for GitHub correctly, run
ssh -T git@github.comin your terminal. You should see something like this:Hi <your_username>! You've successfully authenticated, but GitHub does not provide shell access. - Rbenv: In your terminal, run
ruby -v. Your terminal will output the current version of ruby. It should look something like this:ruby 3.2.2p223 (2023-03-30 revision 957bb7cb81) [arm64-darwin22]. - Node: In your terminal, run
node -v. Your terminal will output the current version of node. It should look something like this:v16.15.1.
If after re-reading and completing the setup steps a second time, you are still experiencing issues, document the problem with screenshots and reach out for support in your Mod 0 Slack channel!